Congratulations on joining waEV-charge! It’s great to have you here.
You can get set up on the waEV-charge app in 4 simple steps.
1) Download the waEV-charge app from the Apple Store or Google Play Store
2) Follow the ‘Set up charger’ link
3) Fill out your details, making sure your charger serial number is correct
4) Check your email for login details to the waEV-charge app
You can start setting up your charging via the app as soon as you received the unit, but it will show offline until your installer has connected your charger.
You can access the [Home] screen for your electric car charger by selecting the [Home] icon in the bottom left hand corner of the app. From here you can set up your charging settings. To do this, tap the [Cog] icon in the top right-hand corner of the app.
We pride ourselves on ensuring that our app, and the products connected to our app, are fully compliant with Government and industry regulations. This means that when you log in to our app for the first time, you’ll find we’ve applied a preset overnight schedule that will charge your car between 01:00am and 05:00am each day, if it’s plugged in.
The app will also always apply a randomised delay to the start of every charging session, which could last from1 second to 10 minutes. This is something we’re required to apply to charging sessions by the UK Smart Charging Regulations (2021). The randomised delay applies to all charging sessions in Instant Charge and ManualScheduling mode, even if you’ve set your schedule at an off-peak time.
You can override the randomised delay in the app by tapping the [Play] button.
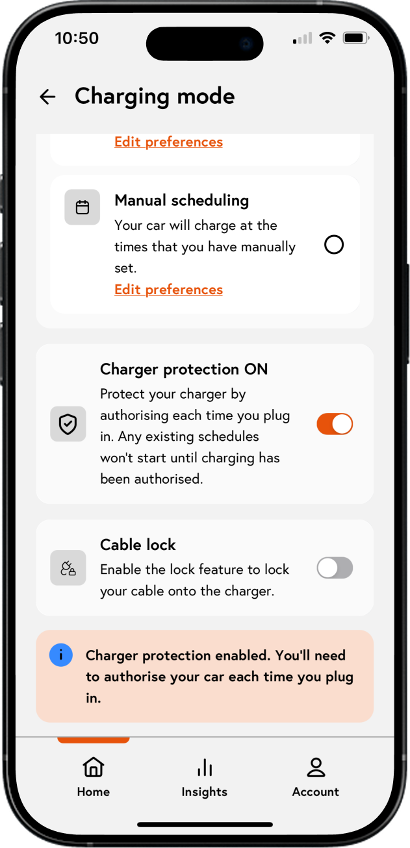
The security of your electric car charger is of paramount importance to us. The advanced security features in our app let you control who has access to the charger, giving you peace of mind it won’t be subject to unauthorised use. When this feature is toggled on, you will need to authorise each time you plug your car in.
● Open up the charger settings menu and toggle Charger protection to ‘ON’.
● Once protection is turned on, you will need to authorise each time you plug your car in, either via the app or by tapping the RFID card provided on the front of the charger.
● If Charger protection is not toggled ‘ON’, then no additional action is required to start charging - you can simply plug in and start charging.
● Your electric car charger will arrive with Charger protection pre-set to ‘ON’.
RFID cards offer a convenient way to start charging sessions directly at your EV charger, in situations whereusing the app isn't possible, such as network issues. If you’d like to use thecards supplied with your charger, you’ll have to register them. You canregister further RFID cards/tags if you’d like to share them with your friends and family.
● Locate the RFID reader, it's usually on the front of the charger.
● Navigate to [Account] > [Devices] > [RFID cards]
● Name your RFID card
● Within 30s, tap your card on the RFID reader of the charger
● Your card is ready, you can now use the card to start and stop charging.
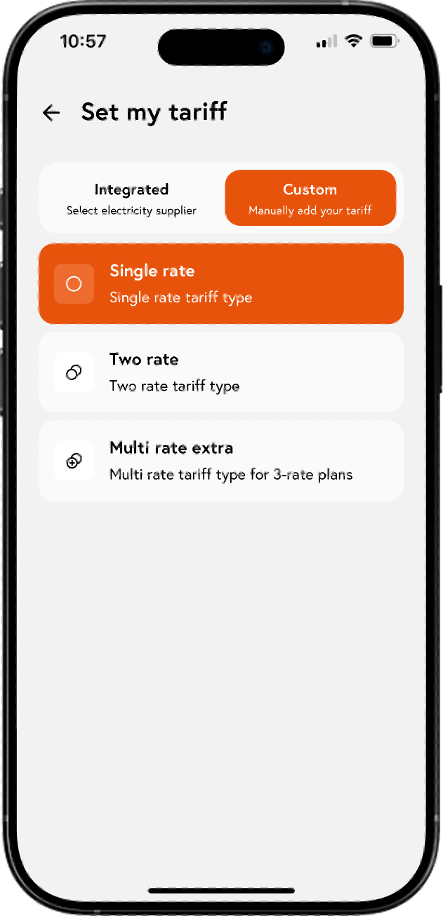
Ensuring you’re on the optimum tariff for your home is one of the most important ways to control your energy costs and carbon footprint. Enter your tariff details in the waEV-charge app to track your costs and help you charge when it’s cheapest.
Navigate to the [Account] tab and tap [Tariff details]. You can name your tariff by tapping[Tariff Name] and entering your desired name.
To complete your tariff information, select [Tariff type] and tell us whether you’re on a single rate,two-rate or multi rate tariff. If you’re on a two-rate or multi-rate tariff (3rates), you’ll need to let us know the timings for when the peak and off-peak rates apply. You can find your tariff details on a recent copy of your energy bill.
Once complete, we’ll start tracking your costs, and, if you’re in automatic scheduling mode, we’ll use your tariff to create the ideal charging schedules for you.
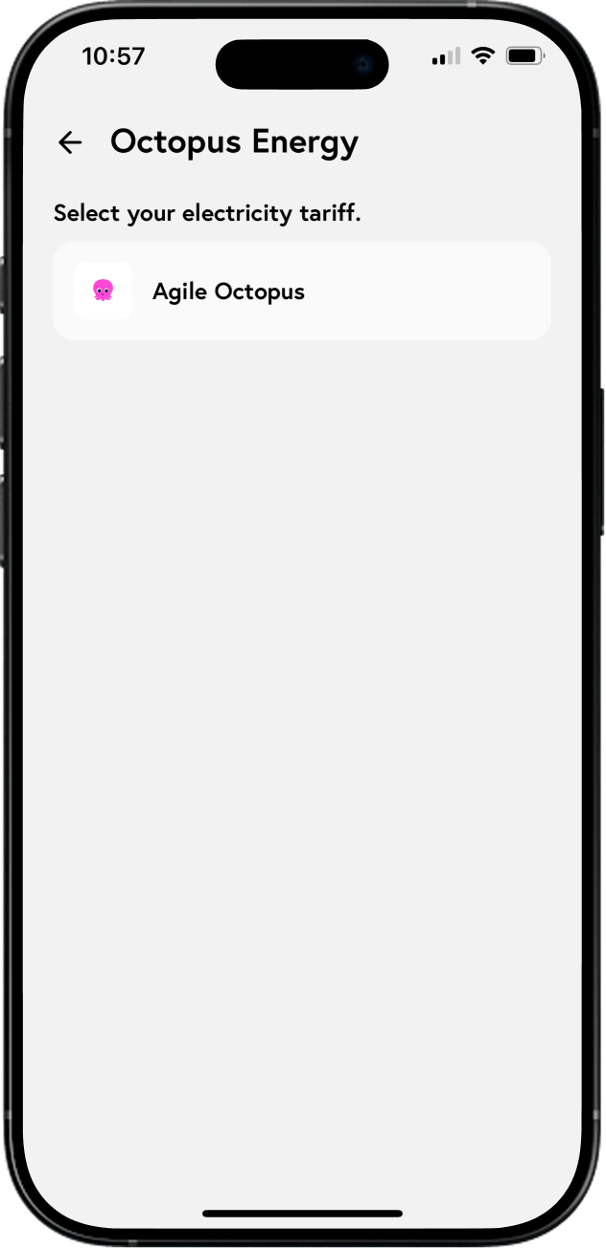
Use our integration with the Octopus Agile tariff to optimise your charging.
To get set up, tap the [Tariff] section in the Account tab and choose ‘Octopus Agile’ from the ‘Custom’ tariff lists. If you have an existing tariff saved, select ‘Change Tariff’.
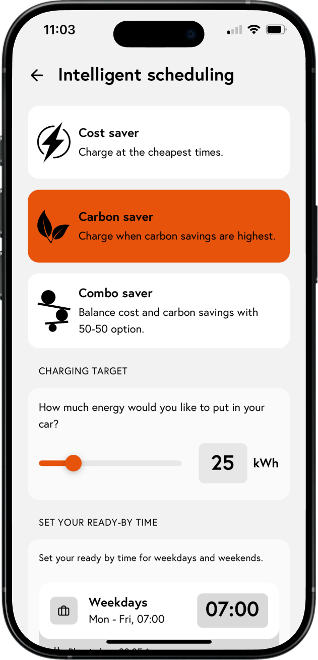
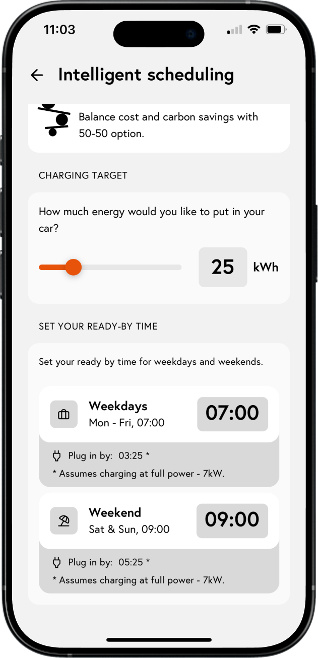
Once you’ve linked your tariff, we recommend setting up your charging in ‘Automatic Scheduling’ mode, powered by Raya.
Raya will use your tariff information to identify the optimum time periods to charge, based on your chosen ‘Ready by’ time and charging target.
When in Automatic Scheduling mode, you can add extra charge whenever your tariff price drops below a certain amount. Simply toggle ‘Smart Top Up’ ON and set your price threshold to enable this feature.
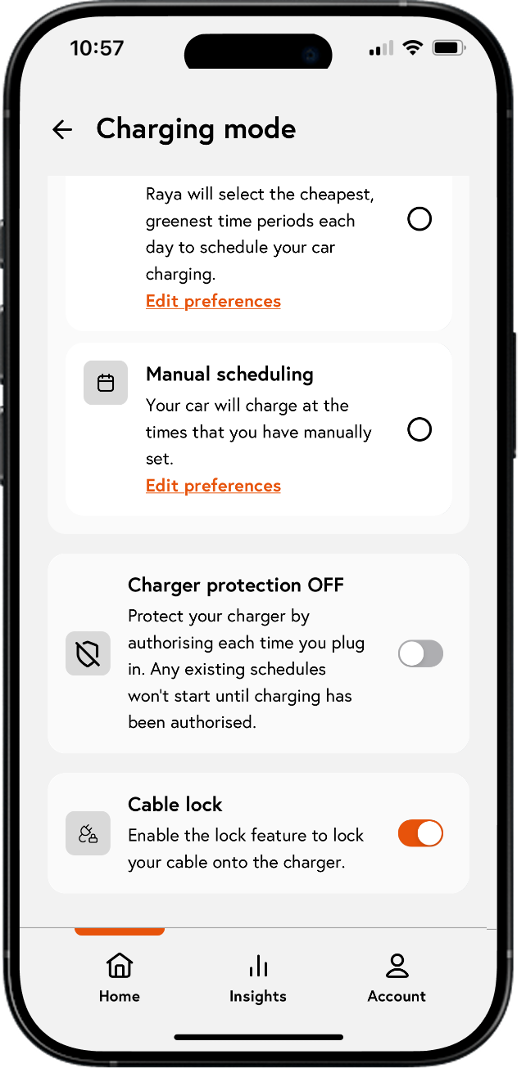
Turn your charger into a tethered charger by locking your cable on the charger connector side. To lock your cable, tap the [Settings] icon and toggle Lock ‘ON’.
Your cable will lock into place during your charging session. Once your session has finished you’ll see an option in the home screen to unlock your cable. Tap this to unlock your cable.
You’re now ready toplug in your EV and start charging.
Save time, money and carbon by choosing Automatic Scheduling. Let Raya, our AI Energy Assistant,create a charging schedule that optimises your car charging to maximise cost or carbon savings, or both. If you’ve got solar panels, Raya will automatically recognise this and predict when the sun is shining so that your solar energy can be incorporated into any charging schedules.
Input your preferences and Raya will create schedules for you during the cheapest and greenest times of the day.
Charge straight after your randomised delay, using Instant Charge mode. To select Instant Charging, tap the [Settings] icon on the home screen and select [Instant Charging]. Your car will start charging as soon as you’ve successfully authorised your plug-in(if authorisation is switched off, you’ll skip this step).
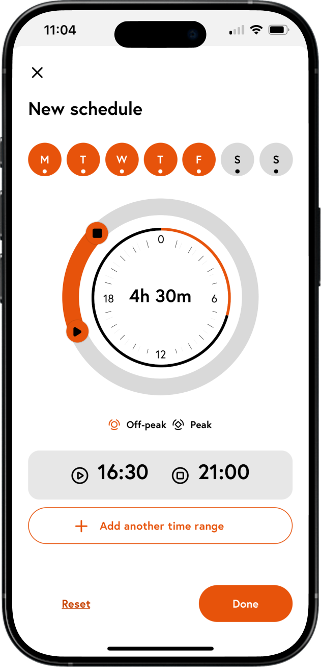
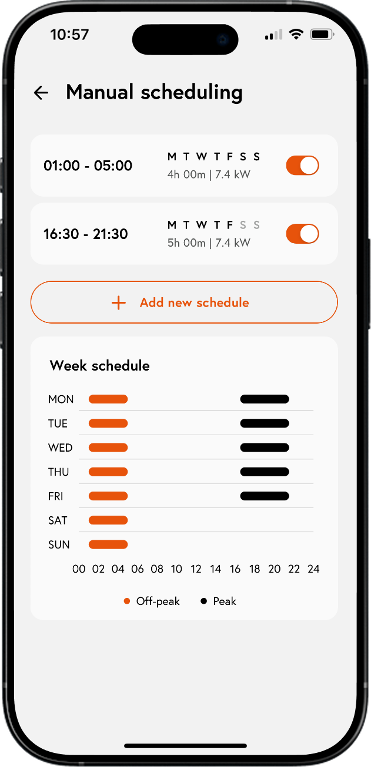
Charge when you need it using our manual scheduling mode. If you’re on a time-of-use tariff, you can use our app to schedule your charging so that you’re only charging your electric car during the cheapest periods. Please note that your charging will start up to 10 minutes after your chosen start time, due to UK Smart Charging Regulations.
To change a schedule,simply tap on the schedule in the manual scheduling preferences screen.
To delete a schedule,tap the schedule you want to delete and swipe left. This will bring up the ‘Delete’ option.
Sometimes plans change and you will find yourself needing to charge your car immediately rather than waiting for the scheduled charging session to begin. If you have a charge session scheduled later in the day but you need to charge right away, you can do so by tapping the [Boost] button. This will cancel any existing schedule and start charging your electric car immediately.
If you need to stop alive or suspended charging session, you can tap the [Stop] button in the [Live session] screen to stop the current charging session.
If you’ve remotely stopped your charge and would like to start a new session, unplug your car and plug back in.
Compatible EVs can now connect to the app. By connecting your EV, you can receive EV battery percentage and range updates, helping you plan your charging ahead of time.This feature is powered by Enode.
Navigate to the [Account] section of the app and tap [Devices]. Here, you’ll see the option to connect your EV via Enode. Continue through the stages and select your brandand vehicle name to connect. You’ll need to give us permission to access your vehicle data and log into your vehicle account to complete the connection.
Once you’ve connected,you’ll be able to view your EV’s battery percentage and estimated range in the app home screen. When you’re charging, you’ll see regular updates to yourbattery percentage and range.
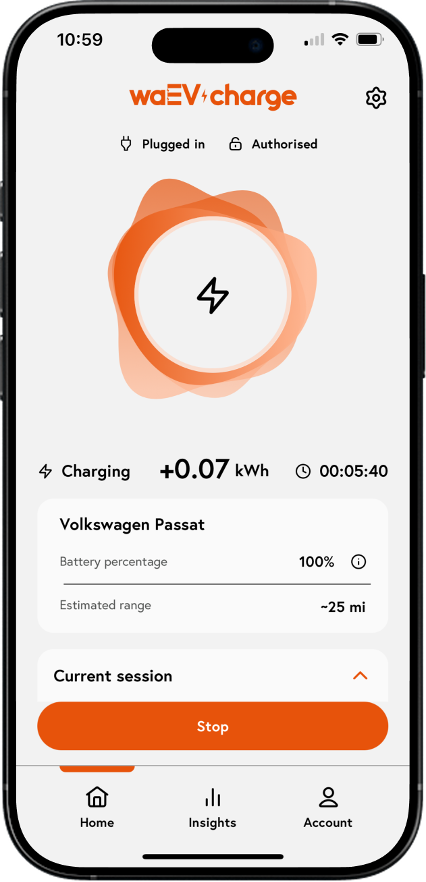
The app enables you to view real-time information about your charging sessions so you can see how much power has been used to charge your electric car, the cost of your charge, the CO2 emissions of your charge, and how long each charging session took.
Once a charging session is underway, the app shows key information so you can keep an eye on progress.This includes:
● Energy: the electricity that has been put into the car (like litres of petrol)
● Power:this shows how quick your car is charging. Full speed is around 7kW but the charging rate may reduce if the power consumption of your home temporarily increases (e.g. when you decide to switch on your electric hob, oven, kettle and toaster at the same time).The charging rate might also decrease if your car’s battery is nearly full, orwhen [Solar] mode has been switched on.
● Cost: the costs of your charge
● CO2 emissions: the CO2 emitted during your charging session
● Duration:the amount of time the car has been plugged in.
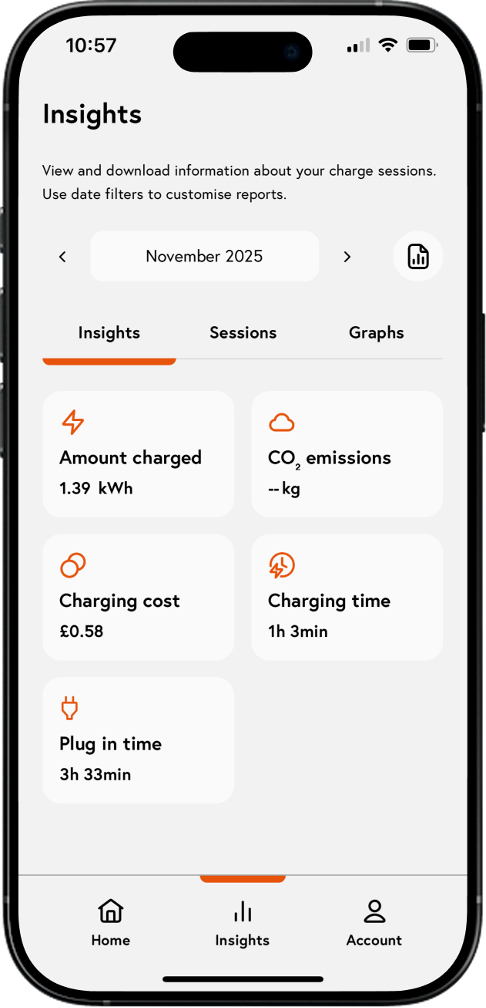
At the end of each charging session, you may want to view the charging performance. You can view performance information in the [Session Summary] screen presented at the end of each charging session. This contains details of the most recent charging session including start and end times, total duration, cost, CO2 emissions and the total energy (kWh) delivered to your electric car.
The app records performance information of all your charging sessions in the [Insights] screen.This enables you to understand when you charge your car, how long for, and how often. This can help you identify trends and help you identify if it might be beneficial to switch to a time-of-use tariff, if you’re not on one already.
You can view your charging session history by tapping [Insights] in the Menu. All your charging sessions from the last month will be viewable as default. You can adjust the date range to view a wider range of charging sessions by selecting the date range in the date drop down menu.
To view a charging session in more detail, tap the charging session you would like to view. This will open the ‘Session Summary’ for that charging session. This includes information on start and end times, total duration, total CO2 emissions, and the total energy (kWh) delivered to your electric car.
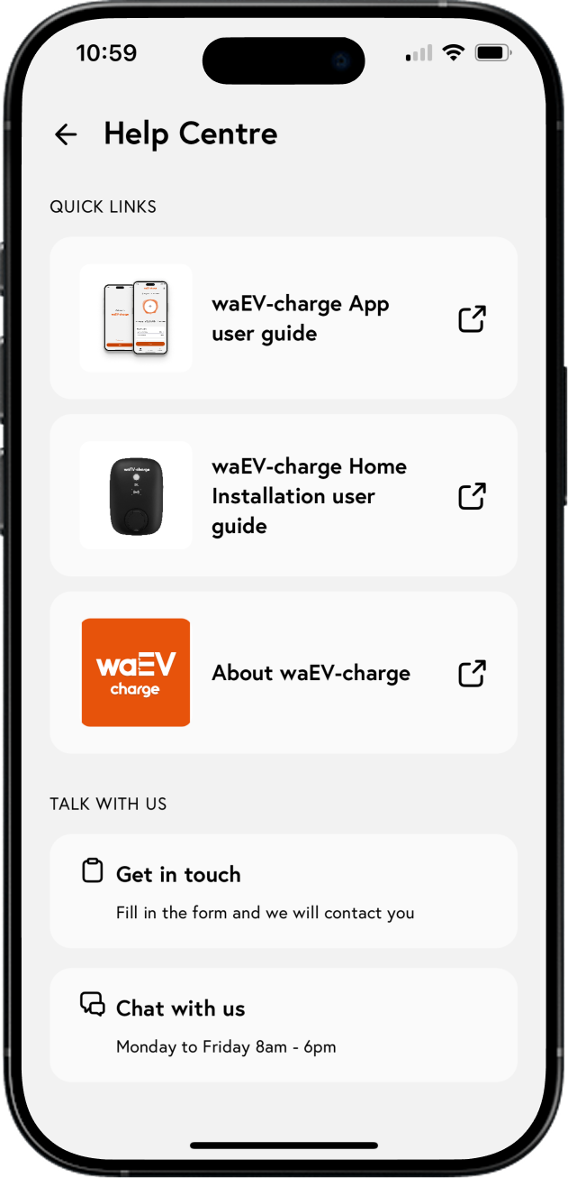
If you need any help on the features of the app and charger, you can find more information in the app [Account] > [Help centre]. The content is categories, have the most popular articles on top and searchable to ensure you find the right answer to your question. It also contains the full charger andapp user guides.
If you still need help, you can get in touch with us, we’ve made it easy to talk to us through our in-app Live Chat feature.
You can find the Live Chat page by navigating to the [Account] section of the app and navigating through to the Help centre. Alternatively, send us an email by tapping [Get intouch].
We’ll ask for yourcharger ID, which you can find by tapping [Devices] within the [Account] section of the app and opening the ‘EV charger’ details.
For less urgent queries you can use the get in touch form.